
Publishers are seeking for ad placements with higher CTR and viewability constantly. At this moment, one of the ad formats which becomes more and more popular is the in-article format.
In-article ads appear between paragraphs of text articles. Introducing this type of ad unit by global ad networks points to its gaining popularity. The Google Adsense and Facebook already give to publishers this format for use, and let them earn more money. But even these big tech-companies return HTML code which requires specific technical knowledge to implement on a website. These codes should be placed at the exact position, for example, after the 3rd paragraph. This format setup can be done for some articles easily, but what if you should show a banner in every article after the 3rd paragraph where articles are thousands. Now, this doesn’t sound very easy and requires developer assistance.
We have a much easier solution. We have developed the creative template for Google Ad Manager (GAM), formerly DoubleClick for Publishers, to show ads in in-article format – Intexter. With this template, you need minimal technical knowledge to use it. Here are the main benefits of using this template with GAM:
- Can be used with any current GAM ad-unit (isn’t must-have need for new ad-units, but we suggest creating separate ad-unit for easier reports);
- The position of ad-unit on a website doesn’t matter. Targeted ad-unit can be placed anywhere in a website’s HTML code;
- The template accepts any kind banners – images or HTML (image banners can be uploaded in the template directly, but HTML banners should be hosted somewhere);
- Set number of paragraph after which a banner should appear in an article (each campaign can have a different number of the paragraph);
- Show banners only on those articles which have enough paragraphs (by setting the required paragraphs minimum); that feature allows you to make a good ratio of content and advertisements;
- Fluid width – accepts responsive banners;
- Show directly sold banners or use 3rd party codes, like Adsense banners.
Now we will show how to show easily Adsense ads between an article in Google Ad Manager.
1. Preparation
Firstly we recommend you to create separate ad-unit in Google Ad Manager to make reporting easier. Give it a describing name, for example, “in_article_1”. You can set any fixed size for this ad-unit, we set 300x250px. More instructions you will find here – https://support.google.com/admanager/answer/177203?hl=en.
And we recommend creating separate ad-unit in Adsense to make reporting easier also. Here is instruction – https://support.google.com/adsense/answer/6002575?hl=en.
These aren’t mandatory requirements. Feel free to follow the next steps without completing these suggestions.
2. Install the template
Get template Intexter. With the installation file of template, you will get instructions on how to install it on Google Ad Manager. Follow those instructions. Follow the next steps when the template installed.
2. Get the CSS path to an article
This part is the most difficult. Open your website on Chrome and open developer tools. Here you can find more instructions on how to open developer tools and select text container of an article – https://developers.google.com/web/tools/chrome-devtools/css/. When container selected, copy CSS path of the selected element (see image below).
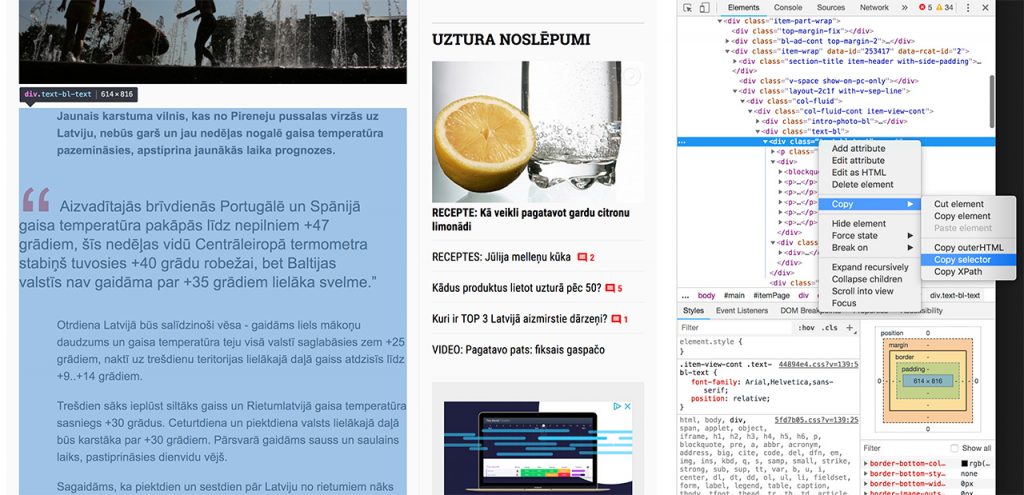
Paste that value somewhere. This value will be required for the template later. You can shorten the CSS path if you have an understanding of HTML and CSS structures.
Of course, you can use other internet browser and its developer tool to get the CSS path to an article.
3. Add a line item
When you have completed the hardest part and have got CSS path to a container of an article, open the Google Ad Manager and add a new line item.
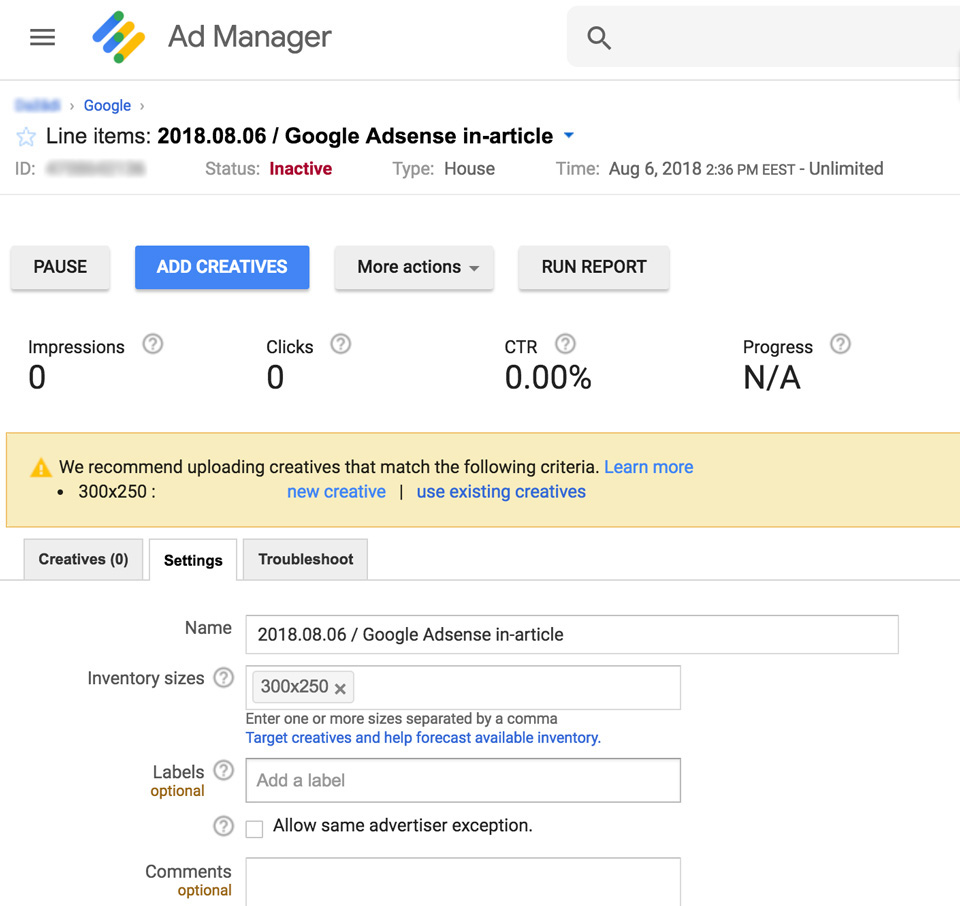
Now add a creative to the line item when it is added with your settings.
4. Add creative
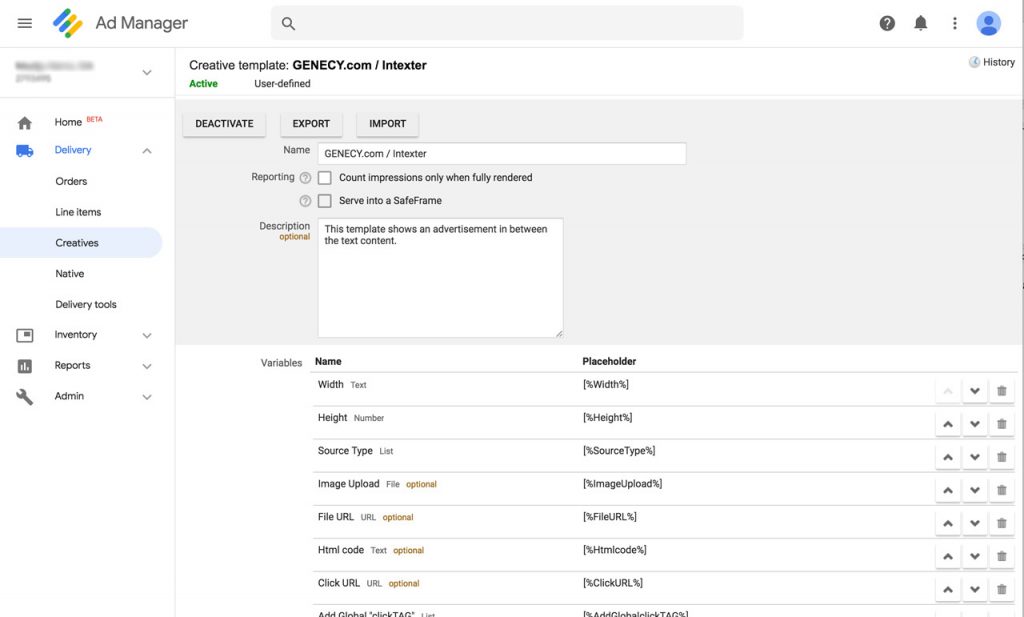
On the line item page click on the button “ADD CREATIVES”. Click “User-defined template” and search for the installed template in the first step by entering its name. Template form will appear. Fill that form with values below:
| Field | Value | Notes |
| Width | 100% | |
| Height | 0 | This set height of ad container to “auto” (adaptive). |
| Source Type | Html code | |
| Image Upload | Keep it unchanged | |
| File URL | Keep it empty | |
| Html code | HTML code of the AdSense ad-unit | |
| Click URL | Keep it empty | |
| Add Global “clickTAG” | NO | Keep it unchanged |
| “clickTAG” name | Keep it unchanged | |
| Open a URL In a New Tab | YES | Keep it unchanged |
| Text container | CSS path to an article | Obtained this in step 2 |
| Child text element | p,ol,ul,blockquote | You can keep it unchanged or change to other HTML tags separated by the comma. The template will search for those elements in an article to locate a position for a banner. |
| Show after | 3 | Set a child text element number after which banner should appear. |
| Minimum text elements | 5 | By this number, you can control whether to show a banner on small articles. A banner will not appear on articles with less child text elements than this number. |
Other fields you can keep unchanged if you aren’t sure what are you changing. Click the button “SAVE” when the form is filled.

Now check results on your website. If everything works great and as expected, watch how profit increases from AdSense. Of course, in a very similar way you can use this template with directly sold ad campaigns or with other 3rd party codes.